The Making of Lady Vader

I knew the minute I saw this anime Lady Vader art that I wanted to cosplay the costume. However, when I started to show my friends, I got a few concerned “Wow, that’s ambitious!” comments. I mean, could I actually pull it off? Would I look ridiculous in all that armor? My head was full of questions about how comfortable I would be, whether or not I could even make everything in time, and if I would even look right as this character. Even after a week or two into the project, I was still pretty hesitant about revealing the cosplay out of fear that I wouldn’t be able to execute. It wasn’t really until I was about 50% done that I “announced” my cosplay and only then did I finally realize that there was no turning back. I have to admit that the 5 weeks or so that I spent making the costume was pretty stressful, tiring, and there were numerous times where I kept asking myself “What the heck am I making?”. But in the end, I had so much fun and am really proud of myself for learning a few new things along the way. So with that, I wanted to share a brief tutorial and the progress pics I took along my journey of making Lady Vader!
The first thing I made was the 2 piece suit, which was made entirely of a 4-way stretch matte stretch PVC fabric (buy here). The stretch came in handy since the back of the top and back of the leggings were not quilted and the fabric was also just the right thickness that I could quilt it without being super bulky. To quilt all the front pieces (front of top, arms, and front of leggings), I drew chalk lines on the stretch PVC (about 3/4″ apart) and sewed the 3 layers together – the stretch PVC, batting, and a thin layer of stretch mesh spandex on the inside.

Once I made the basic front and back of the top, I added a mock neck and sleeves. As for the leggings, I only quilted these about halfway down since I knew I would be wearing tall boots or shin guards.
The leggings and the full suit!

I made the decision early on to eliminate Vader’s outer cape. I really liked the way the inner cape looked feminine and kind of like a dress so I was very specific in draping it a certain way. I even bought my first dress form just for this! I still can’t believe after years of sewing I am just now buying a dress form!
Before and after of the draped inner cape.

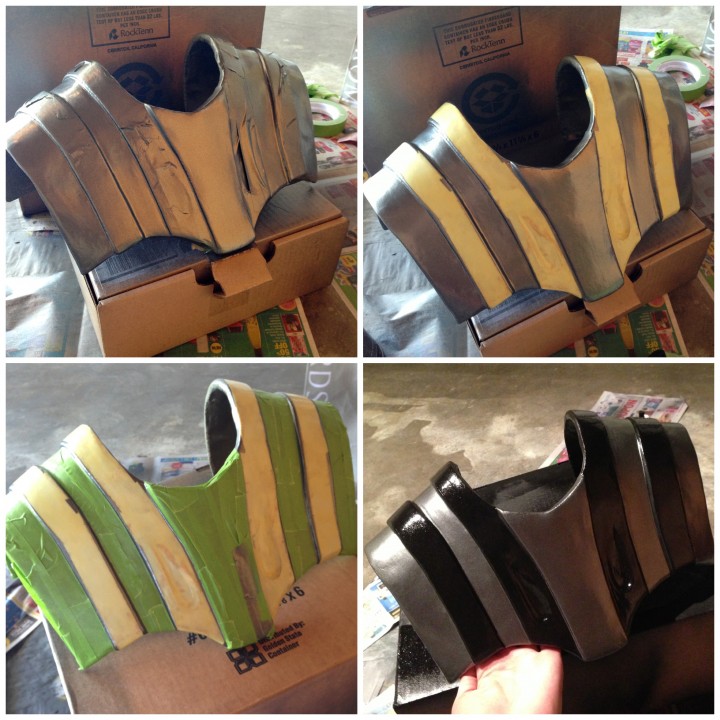
I knew the armor was going to be the most challenging part of the project and I was right. To make the armor, I decided to go with Worbla, which is a thermoplastic very similar to Wonderflex. However, I had never used Worbla before so it was definitely a learning experience. There are a few things I might have done differently if I did it over again, but overall, I was happy with the results. For most of the armor, I used two pieces of Worbla with a piece of craft foam in between. I found this template online, enlarged it on a copy machine and used it as a basis for the chest armor.

Once I had everything fitted to my body, I made the two shoulder pauldrons and cut the two “tear drop” shapes out of the front. To fill in these two tear drop shapes, you could either use putty or do what I did, which was use bondo (aka auto filler).

The decision to use bondo (aka body filler) on top of the Worbla was due to a couple of things – I wanted the armor to be really smooth to the point where it looked like plastic and I didn’t want any imperfections in the shape. Perhaps a ton of gesso primer could have done that, but I didn’t want to take the risk so I decided to do it the hard way and bondo’d everything! I used Evercoat Rage Premium auto filler, which I thought was fairly easy to use although this was my first time using bondo so I could be wrong. :P

The entire 3-4 day process of bondo, sanding, bondo, sanding during a heat wave was pretty tiring and it took a while to get used to the materials. I had to bondo each piece maybe 5-6 times to fill in all those nasty little air bubbles and getting those “tear drop” shapes on the front chest piece was challenging, but I was really happy with the results.

After a few layers of wood glue as primer, it was finally time to paint! Since I was already using car repair materials, I appropriately ended up using auto body paint for the armor. Considering the 3-4 days it took to bondo and prime everything, painting was the fun and “easy” part. I highly recommend using Frog Tape for any of your masking needs – it is way more reliable than the blue tape, especially if you are painting your house!
Masked, painted grey, masked again, painted black.
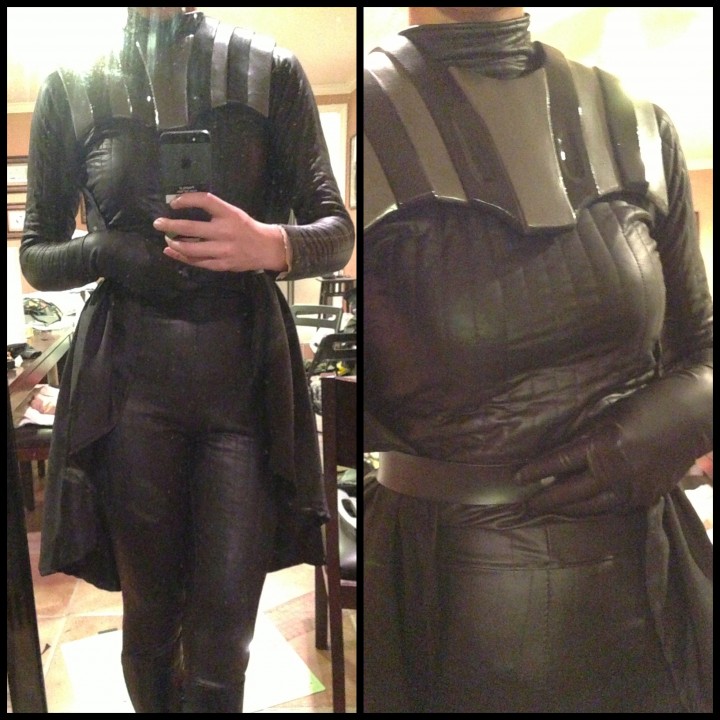
Trying on the armor!

Once all the armor was assembled using sticky back velcro, I just had to take care of a few smaller pieces like the belt. I knew hooking up LED lights for Vader’s belt boxes was a going to be interesting since conceptually I thought I could do it, but in reality I wasn’t sure. I had never soldered anything or made a real circuit, but being the physics nerd that I am, I was pretty excited to see if I could do it. After a quick discussion with the guy at Fry’s, doing some online research, and doing some pen/paper calculations, I was ready to build my first circuit. And Hallelujah! It worked! At that point, I soldered everything together in the two Worbla boxes and taped all the wires down with electrical tape. Since I was running out of time, I had to purchase the chest box so unfortunately that part did not light up. :(
 Finally it was time to actually start trying everything on… To be honest, I only lasted about 15 minutes wearing the entire cosplay in the house so if it weren’t for the great AC in the convention hall, I would have been screwed! This is definitely more of a fall/winter cosplay!
Well, that covers everything for the most part! Definitely let me know what you think of the materials or if you have recommendations. Would love to hear your thoughts!


82 Comments
Crystal Lynn (@geekpinata)
Thanks for sharing this! I get sweaty super, and I mean SUPER, fast. So I commend you and am surprised you survived SDCC with it on but obviously it was well worth it. :) So bad ass!
emilyo
Yeah! Wearing it in my house, I was SO sweaty so I think I would have died without the AC. Plus we were lucky to stay at the Marriott, so thanks god we had minimal travel time!
Jeanette
That’s amazing! Great write up! My boyfriend and I are planning to start experimenting with Worbla & bondo soon but have no idea what we want to make. We just know we want to make something using new material we haven’t used before.
emilyo
Thanks! Can’t wait to see what you come up with!
nerdburgerjewellery
Sooo fantastic to see all the elements of your costume. You are so clever. It looked fantastic and gave me some great ideas for future cosplay.
emilyo
Awesome!
Madenice (@SinaOnline)
You did an amazing job! Love it!! :D
By the way, I surfed around a bit, and found the anime picture is a mix from Darth Vader with Louise Halevy (Gundam), drawn by James Chung. link: http://www.donmai.us/posts/199916
Though I’m not sure which James this made, when you google, you get some lovely images. ^^
emilyo
Oh cool! yeah, I was curious who the artist was… Thanks!
Dennise Ong (@Denniseo)
A question, how did you attach the shoulder armor to your neck armor? Just wondering.
emilyo
The chest and shoulder armor is attached by velcro underneath the armor. That way I had some flexibility in moving my arms. Thanks for the question!
Richard
DAMN! like god damn, I guess it would be too soon ask if you would merry me lol. that is a great costume. Me and my brother are currently building a steam punk vader outfit at this moment, he’s stitching and im supervising.
emilyo
Cool! Let me know how it turns out!
Anonymous
Really awesome work. I’ve seen a Vader leather body suit where the owner had a netting on the back to get some ventilation and covered it with his cape.
emilyo
I read about that too somewhere. I definitely would have made something like that if I thought of it sooner!
Delmar Sutton
Amazing!!!!
emilyo
Thank you!
Anonymous
Amazing work. Tackling electronic parts are not an easy task. Im about to do some experiments with worbla also. Great work!!!
emilyo
Thanks! Yeah, it’s a scary barrier to cross, but hoping next time I can do something more complex!
cabang
awesome, this has to be one of my all time favorite star wars costumes. You had me at force choke!
Andrew G
Simply stunning work.
Was wondering how you were going to deal with the ill-placed chest panel.
Arrietty
Wow this is amazing!!! I love it :D Very creative and looks great on you!
emilyo
Thanks!
Jenmarie
Wow! You did such an incredible job!
emilyo
Thanks so much!
Bina
This is really, really brilliant – not just the idea but also the execution. Personally, though, I would have used real leather to make it more breathable (aka, reduce the sweat factor); but then again that’s also a cost factor.
One thing I’m wondering about, though, is the usage of the term “cosplay” in this article.
“Cosplay” is when you wear the costume and pretend to be a certain character.
You cannot “wear a cosplay”, you can only “wear a costume” and then “do cosplay”.
But that’s probably just the antiqued view of an old costumer like me ;-)
emilyo
I considered real leather, but didn’t want to go with that option for fear of looking to bulky. I’m fairly slim so I still wanted the costume to look slim and fitting as well and I didn’t think leather would have that effect. Plus it’s not as flexible and I didn’t want to feel too stiff especially in tight fitting leather. But thanks for the feedback!
I think the term “cosplay” has become more mainstream now and although initially “cosplay” was used in more of a verb sense, I’ve found that people also use it as a noun now. For eg, “finish my cosplay”, “working on my cosplay”, etc. I definitely see where you’re coming from and I just think the use of the term has evolved a bit.
Andrea Lynne Pollick
you are so fantastic and artistic! I play on using this tutorial for clone wars anakin, since its basically the same armor, just different shapes in the front.
emilyo
Nice!
Anonymous
what about the mask
emilyo
The mask was purchased and then modified. Thanks for asking!
????????
you should take a picture with the mask on
Melissa
I love this! Where did you purchase the stretch pvc fabric?
emilyo
I believe I purchased it from here! Good luck!
Designer TJP
Hi! You are a Terrific Costumer! You made the iconic Darth Vader all you! Wish I had more time to Cosplay the Costumes I make, but I’m just too tired after I finish sewing the goods for clients. I live and work in L.A. Where are you? Would love to Electro Swing with you at a Hollywood Dance Club! Your Designer, Tuck!
emilyo
Thank you! I’m up in the Bay Area. :)
Anonymous
This is So cool, thanks for making some tutorial pics.. it’s So helpful, idk ..still where to Get that fabric, cause i live in Mex, but:) im sure ill find a solution! THANKS U ROCK
Alex
How did u do the quilting for the stretch vinyl suit ? Any tips?
emilyo
It’s made from layers of fabric and batting. Are you having specific issues with this?
brittany
do you remember all the pieces you bought for the electronic part? and what you used for buttons/knobs? it looks fantastic
Vic
Hey, quick question, when you made the pants did you make it out of two pieces with the same pattern or four pieces with two different sized patterns?
emilyo
It’s 4 pieces since they’re essentially leggings – 2 front that are the same but reversed and 2 back, which are the same but reversed. If you are making pants though, I would recommend getting a basic pant pattern or using PJ pants or something.
Vic
Also, love the costume! Inspired me to give it a go :)
Vic
I was going to copy a pattern using some jeans that fit well on me. They are skinny jeans, so if I were to use this pattern would it still fit the same way as with the cloth you mentioned? I just wasn’t sure if I should use leggings I currently have to create a pattern since it may be too tight
emilyo
Yes, a pants pattern would be good, but you also might want to think about if you want these to have an elastic waist or zipper/button since a jeans pattern won’t account for that.
Vic
Would Velcro be an okay substitute? Also did you layer the pants and sleeves the same way you did to the shirt?
emilyo
Yeah, you can really use anything you want and whatever works for you! Yes, I layered the pants and sleeves the same way as well. I only quilted the front of the pants since the back of the pants is covered by the cape anyways.
Vic
Thank you for answering my questions! I’ve seen your other cosplays and they are amazing. You are quite talented and I hope to be able to make such creations! Your advice really has helped me :)
Anon
Hi ^.^ how did you make the shoulder pads? I’ve had an especially hard time getting the right shape so it looked alright with the chest piece
emilyo
Check out Kamui Cosplay’s armor book where she has some shoulder armor shapes. They’re essentially two eyeball shaped pieces that come together to form a shoulder pad. Best thing to do is to just make some out of cardstock or magazine cover paper and then tape them together to see what I mean. Then resize as needed!
Erin
This cosplay is AMAZING! How did you go about modifying the mask? Was there a specific model/tools you used?
emilyo
Mostly just a really good Exacto Knife! I’d recommend using this one.
Jessica Goe
Hi there!
I was wondering if you would be willing to sell this costume? I love it so very much as I am a HUGE Star Wars fan especially a Darth Vader fan.
Thanks!
emilyo
Hi – Sorry, I’m not selling this costume nor taking commissions at the moment. It was a very laborious costume to make and I just don’t have the time to make it again.
Bekka
I’m doing my own spin on a feminine Darth Vader. Where did you find the chest box you purchased? Its the exact idea I’m trying to go for, wearing it as a necklace :)
Thanks!!
emilyo
I bought it off ebay and modified it a bit. I believe it’s a voice changer box/toy thing so try to search for that.
Caroline
You do such great work! The end result is great and I love your blog! Doing my own female spin on this and love how you did the mask. What mask did you purchase? Do you have another picture of it? Would love to see how you cut / trimmed it down. As for the chest box, how did you attach it or is it hanging form a lanyard?
emilyo
Hi and thanks! Unfortunately I didn’t take any photos of the original. I scoured ebay for different Vader masks and just purchased on that fit my budget. As for the chest box, it’s kind of attached via a lanyard in the same material as my shirt.
alyssaacree
I’ve loved this since I first saw it a few years ago and I’m finally trying to do it myself! How did you get the cape to be so feminine and flowy?
emilyo
I used my mannequin to drape the fabric and then cut it into the shape I wanted.
Anonymous
Where did you find the dial knobs for the belt pieces? been looking but no luck.
emilyo
I think they were computer or hardware parts.
Haley
How did you do the cape? I can see the fabric it is made out of. I am just curious as to the shape you used when cutting it.
Anonymous
Just wanted to say thanks for the tutorial – you introduced me to Worbla & I finally got a dress form, yipppe! You can check out my costume here: http://www.chadrphoto.com/CHC-Halloween-Hunt/n-p9LcTs/i-4BkxH9x/A
My horse was a bit fresh to start & bucked one of my shoulder pauldrons off… will rivet for next time, velcro not quite strong enough for riding. Cheers, Sam
Sam Mitchell
Hi Emily,
Just wanted to thank you for your tutorial & introducing me to Worbla… WOW! Also you gave me the final nudge into buying the dress form I’ve wanted for years and the day I found it they were 50% off. The force is with me! Your costume inspired mine which you can see here.
http://www.chadrphoto.com/CHC-Halloween-Hunt/n-p9LcTs/i-4BkxH9x/A
It’s just a rough draft, want to build on to it for next year. I had to modify a bit to make it rideable, blew a pauldron warming up (Heathcliff was a bit snuffy about the cape) so will rivet on with leather straps for future.
All the best with your health & your projects,
Many thanks,
Sam
emilyo
OH MY GOODNESS! What an amazing photo! You did an awesome job with everything and I absolutely love the pic. Would you mind if I shared the photo on social media?
Sam Mitchell
Thank you so much! I helped a bunch of people get on board with the theme (Calgary hunt club – no foxes, no hounds, just horns, whiskey & red coats!) so there are some good photos. Hubs was Chewy but the wind wrecked his hair – need bobby pins! Would be delighted for you to share! If possible could you do it from Chad’s page, he is so lovely & just starting out, I try to give him as much exposure as possible. All photos here… enjoy :) http://www.chadrphoto.com/CHC-Halloween-Hunt/n-p9LcTs/
Sade
That kicks ass. Now I have to up my game.
Kara Trevor
Nice costume! Playboy magazine also offered the look of Lady Vader in 2015 Star Wars special.
Jay Hector
hey sweetheart i just stumbled onto ure cosplays and gotta say.. awesome, deffinatly given me a load of inspiration for my next few , thanks for that :) brilliant work x
Lorna
What is the “groin” protector made of?
emilyo
It’s actually spandex covered foam.
Elena
Happy to meet another Miss Vader! :) You did a nice work! I did a Darth Vader cosplay too! :)
emilyo
Very cool! Your armor looks amazing!
AmyS
Very good job! Can you give me a hand? How did you do the shoulder pads? I’m having trouble making a. I have no idea where to start.
emilyo
Hi! All the materials I used are stated in my blog post! If you want to try using a cheaper material, I might go with EVA foam.
Alex Ford
Hey, I made my own vader chest and shoulder armor (esb version). Did you have any trouble with the frogtape leaving stick marks when you took it off? I painted my armor black, taped the black sections, then painted it dark gray. Instantly took of the tape after painting to get a clean look, and the tape left marks on the paint (like a slight impression, not a stick mark). I tried this like 3 times, with the same results. Tried frog tape, and blue painters tape, all with the same results. Used black gloss rustoleum paint, let it dry for 2 days before putting the tape on (FYI).
emilyo
No, I didn’t have that issue. Weird! Maybe the frog tape didn’t like the brand of spray paint you used? I used car paint for mine and made sure to do thin coats. Sometimes thick coats can mess things up.
Lieke
Hello, may I ask how you attached the cape in the back? I wanna try to make this too! your work is great, I admire it so much!
xoxox
emilyo
I just used some regular snaps that you can buy at the fabric store!
Fabric Heart
very fantastic! I am sure the fabric exchange has so many choices of fabric for this kind of project.
Viktor
What did you do to make the mask?
I had a friend 3d print a vader half mask for me, but even scaling it down to my size, it was still too disproportionate to fit right
emilyo
This was a store bought mask that I modified and repainted. You might be able to do something like that!