Becoming Dragonslayer Ornstein

Usually I like to do a write up after every cosplay I make. However, I feel like I don’t even know where to start for the Dragonslayer Ornstein cosplay I debuted at SDCC 2014. I was contemplating cosplaying Ornstein back in May when I beat Dark Souls after 100+ hours of gameplay, but knew it would be extremely challenging. However, after my trip to Paris and seeing the amazing armor pieces at Les Invalides (here’s an example), that pretty much sealed the deal. Ornstein was one tough cosplay and it pushed me in ways I never imagined. It wasn’t necessarily that it was impossible to build, but I think it was more the sheer scale of it that made it the most difficult cosplay I have built to date. Plus with only 6 weeks to build it and between travel, weddings, and work, I still can’t believe I pulled it off.
So, where do I begin? Made mostly out of Worbla, foam, and some Wonderflex, I used a combination of online photos or Worbla armor, Kamui Cosplay’s new armor making books, as well as lots or trial and error. As always, I started with lots of card stock and began making lots of templates (good thing for big Restoration Hardware catalogs!). I wanted to get the base shapes down before adding any details and here’s what I came up with for the main pieces – shoulders, arms, thighs, shins, and shoe covers (not shown). All of the pieces are made of basic craft foam sandwiched between two pieces of Worbla.


Here’s an example of all of the pieces needed just to make the thigh armor.

For the chest piece, this was mainly 2 big pieces (the 2 most center) and then two small pieces added to the left and right side of those (versus having 4 thick layers). For the back, I went with the “bra band” style and had it wrap around my back w/a slight opening so I could put it on.

As for the hip armor (what I like to call his “skirt”), I decided against the sandwich method and instead used Wonderflex for a couple of reasons. 1) I wanted the skirt to have movement, not be super thick and bulky 2) Wonderflex by itself is thicker than Worbla. If I had used Worbla, I would have had to double up on each piece versus just using one sheet of Wonderflex. I connected each of the skirt pieces using D-rings and used many scraps of Worbla to add details and trim.

At this point, I was just about ready to add details to everything. Keep in mind that many times with video game characters, you don’t have great reference photos except from pixelated game art, concept art, or even fan art. But one great tip I took away from Kamui Cosplay’s books was just to remember that in the end, the costume is really for yourself. It’s your interpretation, your ideas, and you have the creative freedom to make it look how you it to look. So no matter how “accurate” I wanted to be in my mind, I had to remember that this was my costume and my interpretation. With that in mind, I had to take some creative freedom when it came to designing the details or Ornstein’s armor.


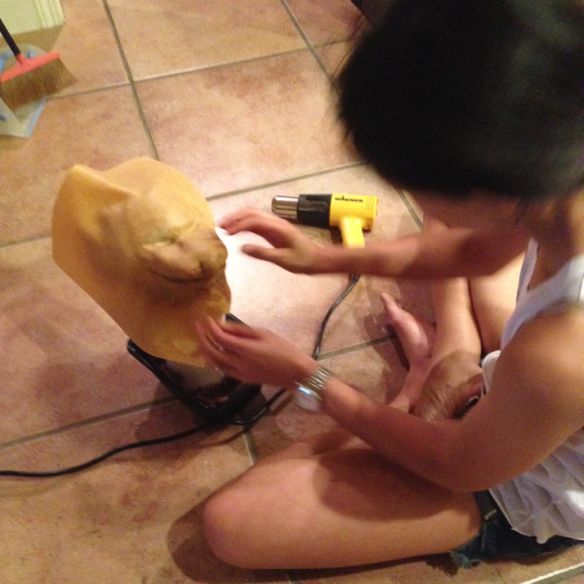
I knew the head piece was going to be challenging so I tackled it last. I decided early on that I was going to go the more comfortable route by making a head piece that would sit on top of my head rather than covering my entire face. I just couldn’t imagine being under a full helmet all day and on top of that wearing head to toe armor! To build the infamous lion face, my plan was to sculpt the face, cover it with Worbla, and then “peel” the cooled down Worbla from the clay. Easy, right? I started out by sculpting the face out of Monster Clay, which I sculpted directly on to a styrofoam head so that the proportions would be correct.

Then I stuck everything in the freezer for a while so that it was extra cold. After 20 minutes or so, I heated the sheet of Worbla and started molding it into the clay “face”. After everything cooled, I carefully pulled off the Worbla “face”, which was pretty much now a shell for the head piece.
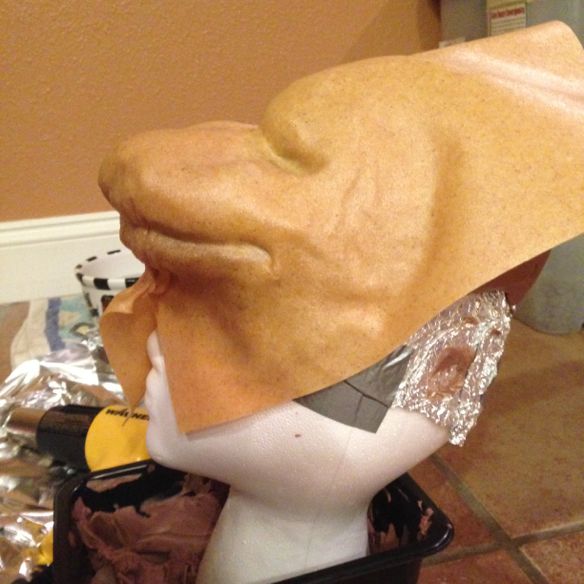
With the shell complete, I started building around the face and adding the spiked details. Lastly, I added a band in the back since I wanted to have a red “plume” ponytail coming out the back.


FINALLY, it was time to paint! Kamui Cosplay also happened to have a book on cosplay painting so I made sure to read that over, gather all my painting supplies, and just go for it. The base of the armor was all gold chrome paint mixed with some hammered gold paint from the hardware store. After that, I used basic acrylics wit brushes to hand paint the shadows and details. Actually the most handy tool I used was my fingers as I found it much faster to blend things that way!

What a difference shadows make!


 As for Ornstein’s spear, that was a mix of PVC pipes, and leftover Worbla and Wonderflex. I had to get a little clever with shapes – either by covering foam pieces with Worbla or wrapping the PVC pipe in duct tape to add thickness in some parts. For the spear, I initially thought to carve expanding foam, but in the end glued a bunch of foam boards together, carved those out (each layer or red/yellow is a layer of foam board) and covered them with Worbla. For my first time carving foam, I am surprised everything turned out ok!

Once that was all done, it was just a matter of adding all the details and then painting everything.


The last bit was adding a variety of D-rings and straps to make sure everything stayed on. Most of my straps were wide elastic bands attached to sew-on velcro. And to my surprise, after an entire Saturday of wearing this shoulder to shoulder around the floor, getting scratched, and bumped into, I was pleased to find that the armor was surprisingly comfortable and that nothing fell apart! Woo hoo!
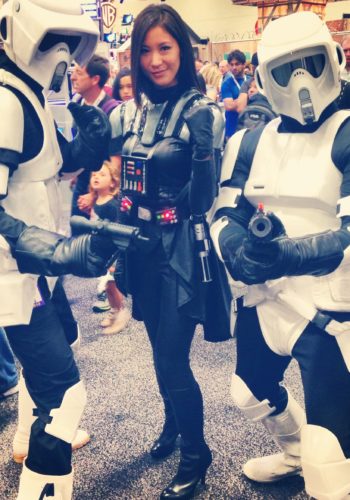
Overall, I think the best thing about wearing this cosplay was getting stopped on the floor to talk to others about the Dark Souls game. For those who have played the game, it almost feels like you instantly bond because of the level of difficulty in the game. You both understand the emotional roller coaster that the game puts you through and having people really appreciate the costume because of who the character is was really rewarding to me.
And lastly, a huge thank you to my husband who pretty much lost me for a good month or so while I was heads down working on this costume. Thanks for your patience during all those late nights, keeping me calm during my panic moments, and making sure I got fed!


8 Comments
Nina Penalosa
To say “wow” is an understatement. You did such a phenomenal job on your cosplay! Wish I bumped into while I was there, it would’ve been so awesome to see this in person! :)
Cheers,
Nina // lefancygeek.com
emilyo
Aw, thank you so much! Too bad we didn’t get to meet!
Jeanette
This is so cool! I wish we has a chance to see it in person. Great work!
emilyo
Thank you!
Natalie Dana Maletz
Wow, what beautiful, incredible work! So stunning. And thank you for the in-depth explanation of how you did it. Do you have a full-length photo of this cosplay?
iammania
This is impressive!
Yale Waller
I would be entirely willing to pay you to make me that spear. How much?
emilyo
Feel free to message me at ems@thestylishgeek.com